Bluescreen / Greenscreen Tutorial
Set up: Material: You can use any sort of greenscreen or bluescreen material that you like. But you should make test shots, before buying too much of it. Some use special bluescreen material, some use cardboard. I remain to those who use cardboard pieces of about 1m^2. I stuck 4 of them on a 2x1,50 meters big wood frame. Finally it should have cost about 20 -30 euros. (disregarding the fact that the wood was already there). That works for some proper close ups. My material has kind of a silky surface, but it´s still paper. Just make sure your material does not reflect or even mirror light. The set: The best way to avoid any blue/green light reflections onto your actor is to set the color screen 6 meters behind the actor. Of course, a little less is okay, and of course you can go further. It always depends on the size of your screen and your space. But you can still achieve great results with a distance of only 1 meter. The big distance will also help you focus the camera ONLY on the foreground (actor). In that case the background (color screen) will be blurred, which will eliminate some irregularities of your color screen. Lighting: Lighting the color screen: -Two equal and average white light sources are recommended. Don´t use anything that shows up different light saturations or values on a color screen. -Don´t light your color screen too bright or too dark. It will create white or black shades on the screen. -To enhance the color of the screen you can additionally light it with one or two more light sources that are covered by transparent color filters. The color must, of course, match the screen´s color. Lighting the actor: -Your actor should not wear any clothes or parts that are of the same color as the colorscreen. -A higher contrast between the screen´s color and your actor´s color (hair, skin, clothes) is always helpful when it comes to keying. Note: blond hair/ bright clothes=>bluescreen; dark hair/ dark clothes=> greenscreen. Explanation: Green is brighter than blue. -You can support your keying program by using one or all of these methods: Additionally light your actor in the complimentary (opposite) color of your color screen to gain some more difference between your actor and the color screen: Bluescreen=> yellow light Greenscreen=> red/orange light -To set your actor in a different light you can set up another bright (and white) lightsource on the ground, right behind your actor. Of course, make sure the lighting floods upwards. This will make your actor´s edge much brighter, or at least create a white line, which will also help your program defining the difference between the background and the forground. Due to the brightness of this white shine, this technique is recommended especially for bluescreens, since blue is darker than green, as stated above. Some notes of importance: -Always make test shots of your lighting set up and the actors, or at least their costumes. -Grey can sometimes look blue on video. TEST everything that is grey on a bluescreen. But you should rather use a greenscreen for that issue. -Make sure that your tests have got the same lighting conditions as the actual shooting. That includes turning off all the other light sources in your studio. -At the end of your set up you should be using 3-7 light sources. -Some cameras can create a grainy look to the video. That´s because of certain color, brightness, contrast or lighting conditions that your camera supports. Just play around with your camera until you get a clean, colourful image. For some [DV] camcorders: Use the "Indoor" lighting setup. (Somewhere in the menu) -Good luck. Tutorial by Malte Derks
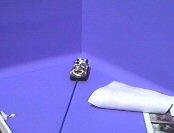
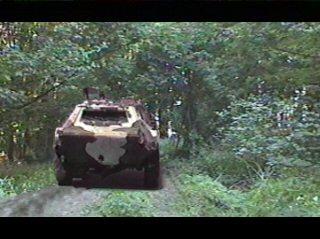
Sunlight as the only lightsource (miniature!) / Final comp.
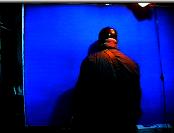
Additional red light on the actor / Final composition To make the red light appear blue in post, you´ve got to key out your actor and THEN alter the color settings of your foreground clip. For example: blue monochrome filter, or change of hue and saturation.
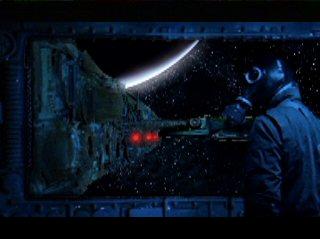
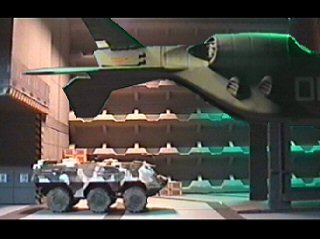
The dropship has been layered onto the miniature hangar shot. I used a bluescreen and, as you can see, some green extra lighting to enhance the difference between the ship and the bluescreen. By the way, EVERY blue value has been jerked out of all those three bluescreen shots above (of course, the background stayed the same).
Verantwortlich für den Inhalt dieser Seite ist ausschließlich der
Autor dieser Homepage, kontaktierbar über dieses Formular!